

DIY: Hand-lettered envelopes
Posted
By Kara Furr
Creative and striking hand-lettered invitation envelopes are all over the Internet this year, and when it came time for me to send out my own wedding invitations, I just had to have that look for myself. So I gave it a shot, and as it turns out, it's really not so hard!
Supplies:
Envelopes
*Calligraphy pen (I used a gold DecoColor calligraphy pen)
Stamps
Washi tape (optional)
* Note: This is not a traditional metal-nibbed calligraphy pen, but a flat-tipped paint pen that mimics the lines of one. Feel free to use a real calligraphy pen, but it will likely take a lot more practice.

Procedure:
First things first; decide how you want your envelopes to look. Take a little stroll around Pinterest and decide what style you like. Then purchase your envelopes and pens to coordinate with your invitations.
When I was first looking for advise on DIY invitations, everyone was quick to say not to even attempt this if you have bad handwriting. I don't buy that. I think you can make your handwriting work for this, no matter how untidy it may be - I, for instance, have terrible handwriting, and mine turned out OK anyway. Think of it as a little bit of added flair.
All that said, there's no room for error with this particular pen. Getting this to look nice takes a quick and confident hand, because every wobble or pause is visible, so practice your writing with both a regular pen and your calligraphy pen until you're confident in the way it looks. When you're ready, try it out on your envelopes.

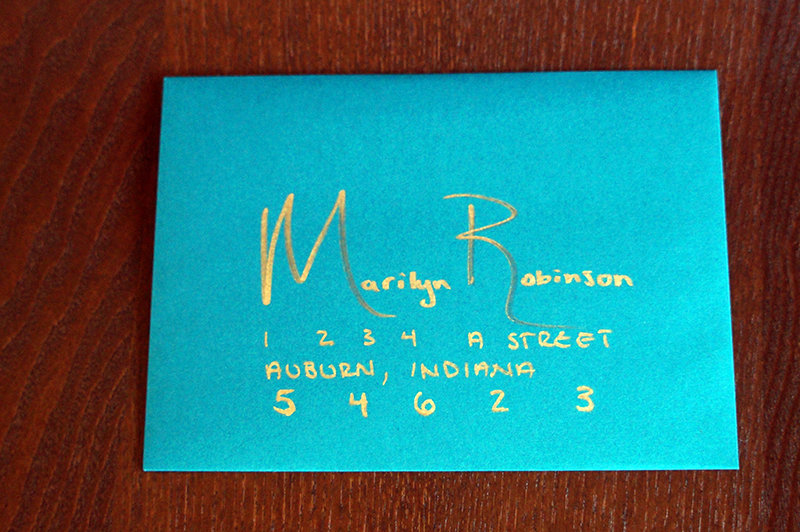
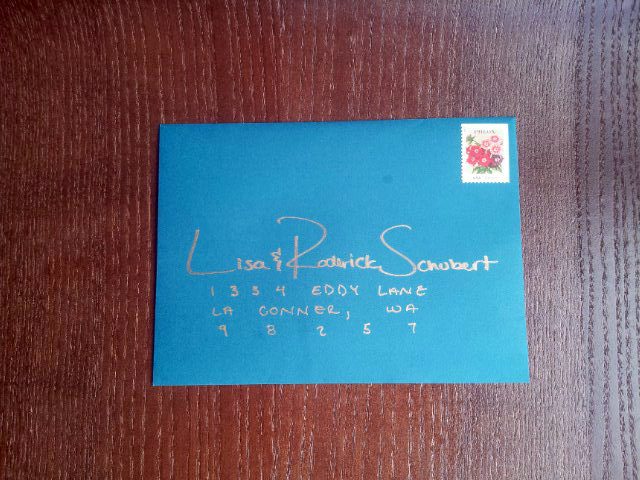
You can make the addressee's name as creative as you'd like, but be kind to postal workers and keep the address itself fairly straightforward and legible.

Don't like how it looks? Try it again! If you're going to be hand-writing your invitations, be sure to buy extra envelopes to give yourself room for error.
If you're worried about using a calligraphy pen, you can also fake calligraphy. To do this, you simply write the addressee's name in whatever style you'd like, and then add a second line onto every downstroke. Here's how it will look:


Like using a calligraphy pen, this will take some take some practice to get right. It also takes considerably longer to write this way, so keep that in mind if you're sending out lots of invitations.
Once you have the address all written out in whatever style you've chosen, all you need to do is add a stamp that compliments the colors you've used, and you're ready to go. You can also add a strip of washi tape or a sticker or stamp of some sort to the back of the envelope once you've stuffed them for a bit of extra personalization.
And here's the final product! Mine didn't turn out quite "Pinterest perfect," but by not worrying about each one being absolutely perfect, I was able to write and send all my invitations in a reasonable amount of time without sacrificing too much quality.
And here's the final product! Mine didn't turn out quite "Pinterest perfect," but by not worrying about each one being absolutely perfect, I was able to write and send all my invitations in a reasonable amount of time without sacrificing too much quality.

Do you have any tips or tricks you'd like to add? Did we miss anything? Tell us about your experience writing your own invitation envelopes (or calligraphy of any kind) in the comments below!


